How Have I Built This Site
This side is served using Google Cloud Run and created with Hugo. All the development was done via Google Cloud Shell with my custom Google Cloud Shell Image. This custom image contains code-server and now also Hugo.
There are already some other tutorials using Hugo an Nginx. But most of them are using the port 8080 hardcoded.
According to Google the container must listen to the environment variable PORT.
I’ve also posted that article on Medium. Just have a look to my Medium page which is linked in the left side.
Install Hugo
Hugo has some good documentation how to install it. So I won’t tell you that by myself.
Have a look into my personal Google Cloud Shell image if you want to get some inspiration how to get Hugo into a Docker container.
Afterwards verify the installation with:
hugo version
Create some git repo
Create some new GitHub repo. And connect your local one with the remote.
mkdir <MYSITE>
cd <MYSITE>
git init
git remote add origin <YOUR NEW REPO>
Launch Code-Server in Cloud Shell
You don’t need the authorization as Google handles that for you.
code-server --no-auth --port 8080 --disable-telemetry .
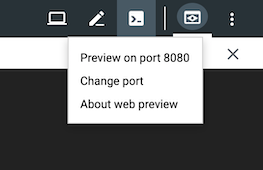
Open the Preview on port 8080. If you get an Not Found error just remove the ?authuser=0 from the URL and you have your code-server running in cloud shell.
Create your site with Hugo
Open another Cloud Shell instance and navigate your git repository. Then create the site with Hugo.
hugo new site <YOUR SITE>
Now you see the folder in your directory. Go into that folder.
cd <YOUR SITE>
Choose and configure your theme
Look for a theme you like and follow the instructions how to configure it. I chose the m10c theme.
Add the theme to your theme path (I did it a bit different ):
git subtree add --prefix <MYSITE>/themes/m10c https://github.com/vaga/hugo-theme-m10c.git master
Add the theme specific config to your config.toml via code server:
languageCode = "en-us"
title = "My Site"
relativeURLs = true
canonifyURLs = false

## Theme config
theme = "m10c"
[params]
  author = "YOU"
  description = "Something you want to say"

    [[params.social]]
        name = "github"
        url = "https://github.com/<YOUR GITHUB USERNAME>"
Watch your site’s preview via Cloud Shell
Start the Hugo server on a port above 2000 (I use 2345):
hugo serve --port 2345 -D
The -D also serves the draft content which is useful for creating new content.
Change the Port on the web preview to 2345 and open the preview.
It’s the same here. If you get an error remove the ?authuser=0 from the URL and it should work.
Add your Content
Open another Cloud Shell instance and navigate to the folder where your site is in. And then create some content:
hugo new posts/my-first-post.md
Reload the preview from Hugo and you should see the new post.
Now you can edit the file in content/posts/my-first-post.md and everytime you save Hugo will detect
and when you reload the page it will serve the latest content.
The only thing I did not get to work so far is LiveReload.
But to be honest I haven’t invested much time in doing that.
Commit your changes to GitHub
# Go into the root of your git repo
cd ..
# Add your site
git add <MYSITE>/*
git commit -m 'My first working site'
Setup the build
I have my build stuff in a separate directory called build except for the Cloud Build as the GitHub App for Cloud Build expects it in the root folder.
So my repo looks like:
.
├── build
│   ├── Dockerfile
│   └── run.sh
├── cloudbuild.yaml
├── <MYSITE>
│   ├── archetypes
│   ├── config.toml
│   ├── content
│   ├── data
│   ├── layouts
│   ├── resources
│   ├── static
│   └── themes
└── README.md
Create a small run.sh
Currently Cloud Run is always using Port 8080. But it also can inject another port as the
As Cloud Run can inject the port as env variable PORT we need to create a small script that starts hugo on the port that gets injected:
#!/bin/sh

# Set valid defaults
additional_cmd=""
 BASE_URL="http://localhost:8080/"

# Add some additional commands depending on the environment
if [[ "${ENV}" == "dev" ]]; then
  # Builds also the drafts
  additional_cmd="-D"
elif [[ "${ENV}" == "prod" ]]; then
  # Sets the production environment
  additional_cmd="--environment production"
fi

# Use the URL set as environment variable if set
if [[ -n "$URL" ]]; then
    BASE_URL="${URL}"
fi

# The Port is passed as an ENV as required by Cloud Run
# --bind=0.0.0.0 allows access from everywhere default is only from localhost
# --disableLiveReload is does what it sais as this is a static non accessible container I don't need it
# --appendPort=false fixes https://github.com/gohugoio/hugo/issues/6362
hugo server --port ${PORT} --bind=0.0.0.0 --disableLiveReload ${additional_cmd} --appendPort=false --baseURL ${BASE_URL}
Make the script executable:
chmod +x bin/run.sh
Create some Dockerfile
In the build directory create a Dockerfile
# Use an intermediate container for downloading
FROM gcr.io/cloud-builders/git as downloader
ARG HUGO_VERSION="0.58.3"
ADD https://github.com/gohugoio/hugo/releases/download/v${HUGO_VERSION}/hugo_${HUGO_VERSION}_Linux-64bit.tar.gz /
RUN  tar -xvzf hugo_${HUGO_VERSION}_Linux-64bit.tar.gz -C /

FROM alpine:latest
ENV PORT 8080
RUN apk add --no-cache ca-certificates
COPY --from=downloader /hugo /usr/bin/hugo
COPY <MYSITE> /<MYSITE>
COPY build/run.sh /run.sh
WORKDIR /<MYSITE>
ENTRYPOINT '/run.sh'
To minimize the size and the number of layers of the Docker image I’m using an intermediate container for downloading and extracting.
For an easy local running I’m adding the environment variable PORT with a suitable value.
If this changes it will be overwritten on the container startup by Google Cloud Run.
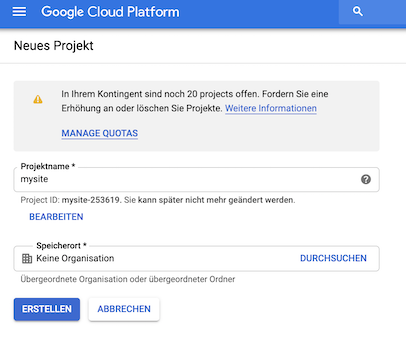
Create and prepare your Google Project
Go to the Google Cloud Platform and create your project.
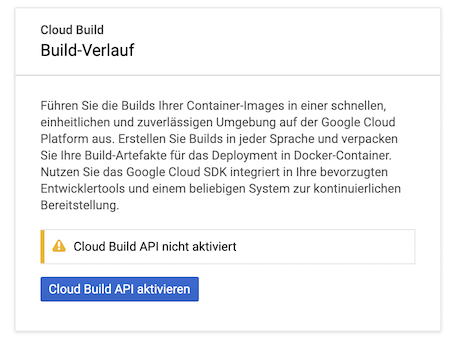
Enable the Cloud Build and Cloud Run API.
For that open the Hamburger Menu on the left side and click on Cloud Build.
For Cloud Run its a bit different.
Go to Cloud Run in the Hamburger Menu. Then click on START USING CLOUD RUN.
Afterwards the Cloud Run API gets enabled automatically.
Create a Cloud Build
In the root of your git directory create a cloudbuild.yaml.
steps:
  - id: Build dockerfile
    name: gcr.io/cloud-builders/docker
    args:
      - build
      - --tag=gcr.io/${PROJECT_ID}/<MYSITE>:${BRANCH_NAME}
      - --tag=gcr.io/${PROJECT_ID}/<MYSITE>:${SHORT_SHA}
      - --tag=gcr.io/${PROJECT_ID}/<MYSITE>:latest
      - --file=build/Dockerfile
      - .
  - id: Push Image
    name: gcr.io/cloud-builders/docker
    args:
      - push
      - gcr.io/${PROJECT_ID}/<MYSITE>:${SHORT_SHA}
  - id: Deploy prod
    name: gcr.io/cloud-builders/gcloud
    args:
      - beta
      - run
      - deploy
      - <MYFUNCTION>
      - --image
      - gcr.io/${PROJECT_ID}/<MYSITE>:${SHORT_SHA}
      - --region
      - europe-west1
      - --platform
      - managed
      --set-env-vars=ENV=prod,URL=<URL TO MY SITE>
      - --allow-unauthenticated
      - --memory=256Mi

images:
  - gcr.io/${PROJECT_ID}/<MYSITE>:${BRANCH_NAME}
  - gcr.io/${PROJECT_ID}/<MYSITE>:${SHORT_SHA}
  - gcr.io/${PROJECT_ID}/<MYSITE>:latest
The first step builds the image. To have it in the registry we need to push it before the deploy step.
With the images: Cloud Build knows what artifacts are created and pushes the Image to the Container Registry, but as a last step. Therefor we need to push it as a separate step.
I’m also creating some more image tags as especially the branch name is often useful for debugging.
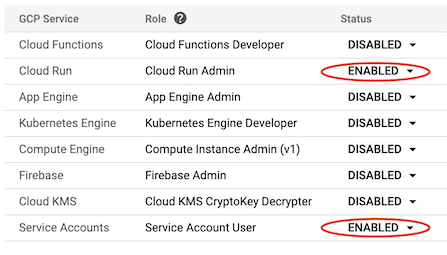
Allow Cloud Build to deploy to your Cloud Run
By default the Cloud Build Service Account does not have the rights to create new Cloud Run Services or create new Revisions of existing Services.
Therefor you have to grant the Cloud Build Service Account the Cloud Run Admin and the Service Account User rights.
To do that go to the Settings section for Cloud Build in the Google Cloud Console.
And set the two roles to enabled.
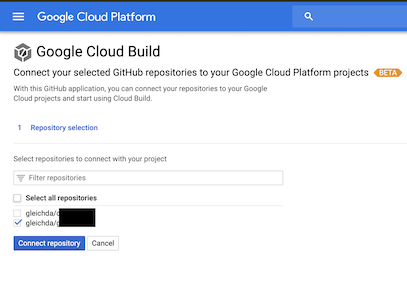
Connect your GitHub Repo with Cloud Build
Go to the Google Cloud Build Marketplace App and configure it. After authotizing Google Cloud for accessing your GitHub repository you can link your repo to your Build.
Now after every commit you will get the latest version installed automatically.
To not deploy to production every time. I’ve setup two Cloud Run instances. One for dev and one for prod. To deploy depending on the branch you need a little workaround. There is an issue opened already at Google’s issuetracker. Let’s hope that gets done soon. So long a little workaround helps:
 - id: Deploy dev
    name: gcr.io/cloud-builders/gcloud
    entrypoint: bash
    args:
      - -c
      - |
        echo "Check if "${BRANCH_NAME}" is valid for dev deployment"
        [[  "${BRANCH_NAME}" != "master" ]] || { echo "Skipping dev deployment"; exit 0; };
        gcloud beta run deploy dev-<MYSITE> --image gcr.io/${PROJECT_ID}/<MYSITE>:${SHORT_SHA} \
        --region europe-west1 --platform managed --set-env-vars=ENV=dev,URL=https://test.<MYSITE>/ \
        --memory=256Mi --allow-unauthenticated
  - id: Deploy prod
    name: gcr.io/cloud-builders/gcloud
    entrypoint: bash
    args:
      - -c
      - |
        echo "Check if "${BRANCH_NAME}" is valid for prod deployment"
        [[  "${BRANCH_NAME}" == "master" ]] || { echo "Skipping prod deployment"; exit 0; };
        gcloud beta run deploy <MYSITE> --image gcr.io/${PROJECT_ID}/<MYSITE>:${SHORT_SHA} \
        --region europe-west1 --platform managed --set-env-vars=ENV=prod,URL=https://<MYSITE>/ \
        --allow-unauthenticated --memory=256Mi
I know this is not really pretty but at least it works.
When cloud build runs it automatically deploys and gives you a URL. But with Cloud Run it is now also possible to use your own domain. And you get a Let’s Encrypt SSL Certificate automatically and it is fully managed.
Use your custom Domain
When you deploy that function you get a .run.app URL from Google. But it is also possible to add your own domain.
On the Cloud Run Page there is a button Manage Custom Domains in the top menu.
Click it. If you haven’t verified the ownership of that domain you have to do that first.
Afterwards click the button Add Mapping. Then select the corresponding Cloud Run Service and the (sub-)domain you want to use.
Leave it blank for no subdomain.
On the next page you get a prompt what you have to update. Depending on if it is a root level domain or a sub domain it’s either updating the A and AAA records or adding a CNAME.
This step you have to do with your domain registrar. Which can also be Google but does not need to be.